This is a guide on how to set up Laravel Valet on macOS for a WordPress local development environment. Using Valet as a WordPress local development solution has the main benefits of speed, being lightweight and using fewer configurations to go wrong than say a solution like Vagrant.
There is a 2nd related article that looks at getting WordPress themes, plugins and settings already installed and ready to deploy.
Valet runs only on macOS and runs directly on top of the operating system, not in a virtual container.
The key software components needed are Homebrew; a package manager and Laravel; a PHP framework.
Valet itself has an Nginx, PHP 7.3 and DnsMasq and by default uses the .test domain name, you add in a database MariaDB or MySQL. Once the software is all installed Valet itself will launch automatically on startup of macOS.
Laravel Valet
Introduction
Valet is a Laravel development environment for Mac minimalists. No Vagrant, no
<span class="token operator">/</span>etc<span class="token operator">/</span>hostsfile. You can even share your sites publicly using local tunnels. Yeah, we like it too.Laravel Valet configures your Mac to always run Nginx in the background when your machine starts. Then, using DnsMasq, Valet proxies all requests on the
<span class="token operator">*</span><span class="token punctuation">.</span>testdomain to point to sites installed on your local machine.In other words, a blazing fast Laravel development environment that uses roughly 7 MB of RAM. Valet isn’t a complete replacement for Vagrant or Homestead, but provides a great alternative if you want flexible basics, prefer extreme speed, or are working on a machine with a limited amount of RAM.
Wocker
What is Wocker?
Wocker is a local WordPress development environment. Since it’s based on Docker, it takes just 3 seconds to create every new installation of WordPress.
Get Started
1. Install Vagrant
2. Install VirtualBox
3. Install the vagrant-hostsupdater plugin.
<span class="nv">$ </span>vagrant plugin install vagrant-hostsupdater4. Clone the Wocker Repository
<span class="nv">$ </span>git clone https://github.com/wckr/wocker.git <span class="o">&&</span> <span class="nb">cd </span>wocker5. Start up Wocker
<span class="nv">$ </span>vagrant upThis could take a while on the first run as your local machine downloads the required files. Watch as the script ends, as an administrator or su password may be required. The first default container
wockerwill be running after the provision finishes successfully.Note: on Windows, run Cmd, PowerShell or other terminals as an administrator.
6. Visit the following site in your browser
How To Export Posts To CSV In WordPress
Add Custom Button On The Post Listing
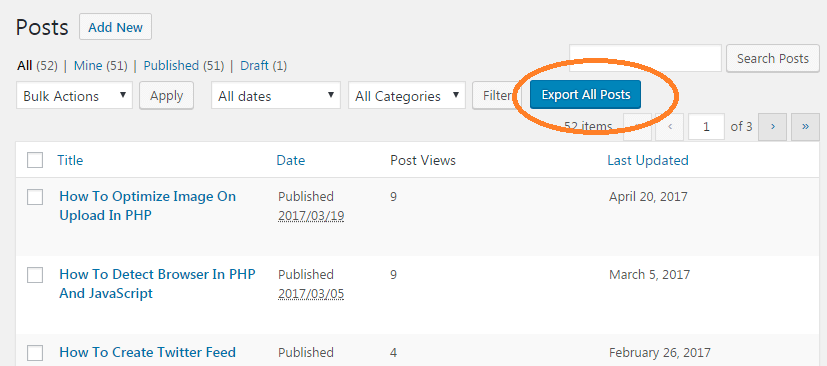
To generate the CSV, we first need to give a button on the listing page of a post screen. On the click of this button, we will write a code for generating a CSV.
Open your
functions.phpfile and place the below code in it.
add_action('manage_posts_extra_tablenav','admin_post_list_top_export_button', 20, 1 );functionadmin_post_list_top_export_button($which) {global$typenow;if('post'===$typenow&&'top'===$which) {?><input type="submit"name="export_all_posts"id="export_all_posts"class="button button-primary"value="Export All Posts"/><?php}}Above code add the button ‘Export All Posts’ on the posts listing as shown in the screenshot. Here, we have used the hook manage_posts_extra_tablenav to place our custom button on post screen page.
Actual Code Which Export Posts To CSV
At this stage, you are ready with your custom button which should generate our CSV. So, let’s add a code that generates the CSV on the click of a button and send it to the browser for download.
Add the below code in the
functions.phpfile.
add_action('init','func_export_all_posts');functionfunc_export_all_posts() {if(isset($_GET['export_all_posts'])) {$arg=array('post_type'=>'post','post_status'=>'publish','posts_per_page'=> -1,);global$post;$arr_post= get_posts($arg);if($arr_post) {header('Content-type: text/csv');header('Content-Disposition: attachment; filename="wp.csv"');header('Pragma: no-cache');header('Expires: 0');$file=fopen('<a style="box-sizing: content-box !important; border: 0px !important; font-family: Monaco, consolas, 'bitstream vera sans mono', 'courier new', Courier, monospace !important; font-size: 1em !important; font-style: normal !important; font-weight: 400 !important; margin: 0px !important; outline: 0px !important; padding: 0px !important; vertical-align: baseline !important; background: 0px 0px !important; color: blue !important; text-decoration: none; transition: all 0.2s linear 0s; border-radius: 0px !important; bottom: auto !important; float: none !important; height: auto !important; left: auto !important; line-height: 1.1em !important; overflow: visible !important; position: static !important; right: auto !important; text-align: left !important; top: auto !important; width: auto !important; direction: ltr !important; box-shadow: none !important;" href="php://output/">php://output</a>','w');fputcsv($file,array('Post Title','URL'));foreach($arr_postas$post) {setup_postdata($post);fputcsv($file,array(get_the_title(), get_the_permalink()));}exit();}}}